Door restoration in three easy steps

Three easy steps to achieve great results and on a Budget too!
Are you sick and tired of looking at the drab doors around the house? scuff marks that won't come off? Paint peeling? Generally looking pretty drab.
Money is tight and you can't afford to get a professional in to repaint the doors and fittings. Well here we're going to explore how you can turn those drab doors into 'fab doors' done so well you won't want to call a painter ever again, and all for a fraction of the cost of a professional repaint.
In this quick and easy to follow lens you'll learn a few tips on how to turn that run down drab door into a spectacular looking one that looks brand new.

Tools for the Job
My Dad always used to say "A bad workman always blames his tools" it's only recently that I realized what he was really meaning is that a good workman will always make sure he has the right tools for the job and they'll be good quality tools.
What you'll need are
1. Something for stripping the paint (Either chemical paint stripper or a heat gun) and a scraper
If you go for the paint stripper, then also make sure you get quality rubber gloves to protect your hands.
2. A sander and sandpaper (both rough and smooth)
3. Wood filler. (get a good brand, preferably one the hardware store recommends)
4. Paint, appropriate to the kind of door it is. If you're doing an inside door not in the shower/bathroom then use a water based gloss orsemi gloss, but in the shower/bathroom it'll need to be oil based simply because wet areas need to be harder wearing.
5. Brush to paint the edges
6. Roller to roll the paint and get a smooth finish
7. Cloth to wipe down the finished masterpiece

Step 1. Stripping, but don't be a tease about it.
Using the right product for the situation
Actually, before starting the stripping you will need to decide whether you are going to strip and paint the door while still hanging or if you want to take it of the hinges.
Part of making the decision will be looking at what method you want to use to strip the door. If you have a confined space that isn't well ventilated then you'll need to take the door off as both methods requre good ventilation. Otherwise, if you want to leave the door hanging then using a chemical stripper will probably be the way to go.
There are two ways of stripping the paint. Each has its own advantages and disadvantages. We'll look at both and make somre recommendations along the way.
1. Chemical stripping. This uses a solvent to strip the paint, it used to be the only way and provided your chemical is within it's "use by" date it should be pretty straightforward to use.
Advantages are that it can be applied with a minimum of fuss and once applied can be left for a while. It can also be used next to carpets (make sure it doesn't drip onto it though!) use an old bedsheet under the door to act as a "drop cloth" to catch any that falls to the floor.
Disadvantage. takes time as you need to let the stripper work. Also it is a solvent and should always be used in a well ventilated area. Some of the more modern ones have a pleasant smell, but this is only a masking agent for the solvent and still needs good ventilation, you should also wear a protective mask specific to the job. Make sure to wear the full protective gear (mask and gloves) as contact with skin will result in burns and can land you in hospital. Using paint stripper can work out expensive as you need to replace the stripper as you use it. It's also messy and you'll need a cloth under the job to catch the stripped paint before the acid damages any other surface.
Buying one tin can set you back about $50 but it will do about five doors. If you've got more than that to do then it's worth looking at the alternative.
2. Heat Gun. Paint blisters at around 250 degrees celsius (400 fahrenheit). the heat gun works by blistering the paint so that it can be removed immediatley.
Advantages. Works quickly and can be removed immediatley (a door takes about an hour to strip each side). is easy to use and requires little protective clothing. Once you have the heat gun then the only expense is electricity to run it (they use up to 2000 watts). It doesn't use any harmful chemicals. Clean up only requires a brush and dustpan.
Disadvantages. It uses heat to remove the paint so using it near carpets can damage the carpet (can melt some synthetic fibres and scorch wool). Also the scraper you use will need to be made from mild steel with a wooden handle (plastic and aluminium will simply melt with the heat!).
Buying a heat gun can seem expensive at first (usually about $70) but you can usually hire them from the local hardware store or equipment hire place for about $10-15 per day. If you've got a number of painting projects to do then in the long term, getting a good one will save you money.
OK. That's the discussion on the method, now to get down to the nitty gritty.
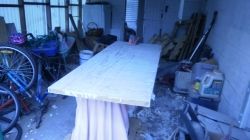
If you've taken the door off it's hinges, lay it on a flat but firm surface.
Remove the doorknobs and doorstops (and any other stuff on the door).
If using paint stripper
read instructions on the tin carefully and apply the stripper as instructed.
Leave for the time that the tin says is the correct time, you should see the paint blistering, if it blisters then it's ready to come off.
Place the scraper at the end of one of the blisters and at an angle of about 30 degrees apply a little pressure and start to move forward. The paint will peel off where the paint stripper has penetrated.
Slowly work with the grain of the wood to peel the majority of the paint off, once you've removed the paint then wipe the door down with a wet cloth and look at whether you need to do it again. If there are places where the paint hasn't peeled then you'll need to apply a second time. Repeat the process.
Troubleshooting
If the paint isn't coming off then there are three possibilities.
1. The stripper didn't have enough time to work. temperature can affect some paint strippers, take note of any directions in that area.
2. The paint was too thick, there may have been more coats of paint than you realized, you'll need a second appication
3. The stripper is out of date. If you just got it from the shop take it back and get one that's in date. If it's been stored in your garage then dispose of it as per instructions on the tin and buy a new one.
Using the Heat gun.
This is relatively simple and provided a few instructions are followed you can't get it wrong.
Place the door on a reasonably level firm surface.
Plug in the heat gun and turn on.
Hold the heat gun in one hand about two inches from the area you want to begin stripping and wait for it to start blistering.
As soon as it starts to blister slowly begin to move the heat gun in the direction you want to go.
Hold the scraper in the other hand and at an angle of about 40 degrees with a little pressure follow the heat gun. It's important not to put the scraper directly under the heat gun as that will stop the flow of heat onto the paint. don't be to concerned about the scraper getting too hot as the wooden handle insulates the heat preventing it from burning you
Follow the grain of the wood (if you work along the length of the door then you'll be working with the grain). Once you have stripped the door (you won't need a second application) you can brush up if you want to (There are no harmful chemicals to deal with).
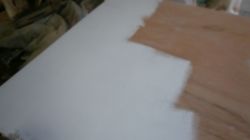
Important to note that you won't be able to take all the paint off at this stage with either method, the goal is to get 90% off and see the grain of the wood over 100% of the door. Take a look at the picture for an idea of the angle you need and how the door should look.
Troubleshooting
Paint isn't peeling. The gun isn't getting hot enough. Make sure you are using a heat gun....Hair dryers don't get hot enough!! Make sure you have it on the right setting. Make sure it's turned on.
Good stuff for stripping


Step 2 Sanding. bringing out the best.
Want a "New door?" This is how.
Now we come to the part of the process that makes all the difference. follw these instructions and your friend will think you've splashed out and bought new! (and at about $300 each when it's cost you maybe $30 to refurbish you can enjoy their envy!)
Once the door has been stripped you'll need to sand it back right down to the bare wood. This can either be done by hand which although cheaper than using a sander it takes a long time and you'll need to be meticulous, you need to get every fleck of paint off to get the smooth finish we're going for.
There are two types of sander on the market, a belt sander and an orbital sander, it doesn't really matter too much which you use, the important part is the texture of the sandpaper you use.
Sandpaper comes in various strengths and is usually known by the size of the grains of sand on the paper. the lower the number the coarser the sandpaper. the "grit" measurements usually start at around "36 grit" and go up as high as "2000 grit". The best way to work this out is that 36-180 grit is usually used for stripping paint, then 200-400 grit is used for fine sanding wood, anything above 400 grit is used for sanding metal and would take too long to get any result on wood (you might use it to remove a very small stain, but that can be for another lens!)
Get your sander and attach a 36 grit piece of sandpaper or pad. With the belt sanders you'll need to fasten it into clips on the sander but some of the orbitals have velcro pads to make life easier, only trouble is you chew through the pads faster than sandpaper!
Once that's on then switch the sander on at the wall (you can get air pressure ones as well but you'll need a fancy setup with a compressor for that, if you don't have then don't go there!). Place the sander where you want to begin and push the button, As soon as you start apply a little pressure and slowly move the sander in an arc to begin removing the paint, keep going over the same area until you are happy you've got all the paint off. Applying to much pressure can cause damage anf gouge the wood, just enough that you feel it but not enough that you tire out, this process will take about half an hour for the door on the rough sand and about half an hour on the smooth sand.
This is the time when you'll find if there are any holes that need to be repaired. If you have holes that need repairing then read my lens that deals with repairing the hole in the door or wall.
The next stage is the smooth sandpaper. the grit should be about 250-280 grit.
Start at one end of the door and work following the grain in long slow strokes.
As you work stop and run your hand along the wood to "feel" the grain. it should be smooth to touch, with no rough edges.
Don't just trust your eyes with this, you'll need to feel the grain with your hand as the eyes can be deceptive and when you paint it will pick up even the smallest defect.
The reason for this is that the palm of the hand is one of the most sensetive parts of the body and can pick up ridges where the eyes would miss them.
Once you are satisifed that the door is as smooth as can be then using a wet cloth wipe down the door, making sure you remove all the sawdust.
The result should be a door so clean that it's tempting to just varnish it and leave a fantastic wood finish.
Sanders
Get the best sander for the job, be they belt or orbital

Painting
With a brush or a roller? that is the question! But what is the answer?
Now we come to the final part, the part where all the hard work begins to pay off, it's time to paint the door.
Make sure that the door and the area are as free of dust as they can be.
Hopefully before now you've decided on what colour its going to be.
Now for the reason we went all the way back to the woodword, it means you can paint it any colour you like. If you were just repainting over an existing colour then you'd be restricted in what colour you can paint over. If the door is a dark colour then you can't repaint it to a lighter one!
A Black door can't be repainted White (it comes out Grey)
A Red door can't be painted Blue (it comes out Green)
With the bare woodwork you can start with any colour you like, but there are a few rules
1. You will need to paint an undercoat. This should always be a lighter colour than your eventual colour, if you are painting white then use the same white paint you are going to use for the other coats. If you are using a tinted colour then get the paint shop to mix you up a half shade of the colour you want. You can use the full tint but it will darken the end result and it may end up darker than you wanted.
2. Decide now whether to use a roller (same as for the walls) or use a Brush. Each has advantages and disadvantages.
Brush
Advantage. It is easy to handle and seems to use less paint,
Disadvantage
takes more time, can appear 'streaky' if not done well. Takes more coats of paint (Four as opposed to the Rollers three)
Roller
Advantage. Gives a great effect. Takes less time and less coats of paint (three as opposed to the four for the Brush).
Working with the Brush.
First and foremost open the paint and stir the tin. Follow the instructions on the tin to the letter.
Looking at the door lengthways you want to draw a line down the middle (Prefrably with a very fine pencil). once you've done that then split each of the segments into four so that you almost end up with a tile effect. start with one of the corners and paint each square following the grain of the wood. Fully paint each segment before moving along to the next.
This is because as the paint dries it can often look uneven, but painting it in such a way minimises this effect and you should get a good clean effect when it dries. Do this for each coat of paint that you apply. Using the brush will give the door a 'grain effect' that can make it feel quite special.
How to know how many coats to apply
It's simple really, you need to apply as many coats as you need to until you get the full rich colour that the paint is supposed to give, normally about four coats of paint. Each coat will take about 45 minutes to apply
With the Roller
Once the paint has been stirred, pour it into the roller tray (the roller tray has a welt where the paint is poured and a kind of board where once you've soaked the roller in the paint you run it over the board to remove the excess.
Once you've got rid of the excess you are ready to roll and starting at one end, following the grain of th wood you can roll the paint on. using a long stroke along the grain of the wood roll until you feel you've used up most of the paint on the roller and then re-apply paint and repeat. The roller gives a great dappled effect to the paint that can enhance the door dramatically. One disadvantage of using a roller is that it won't get right in to where the Hinges are, but that is easily remedied by using a small sponge, just dip the sponge into the paint and 'dab' it over the areas you want to paint, the sponge will give the same effect.
The roller will take approximatley three coats, but the rule is the same as for using the brush, until you are satisfied with the result.
One tip with the roller (and this may sound silly) but after the third coat it may feel a bit rough, this can be cured by getting the brush and literally brushing down along the grain with the brush, It's give you a nice texture to the job.


